Links Course

Rolling landscapes and vast greens


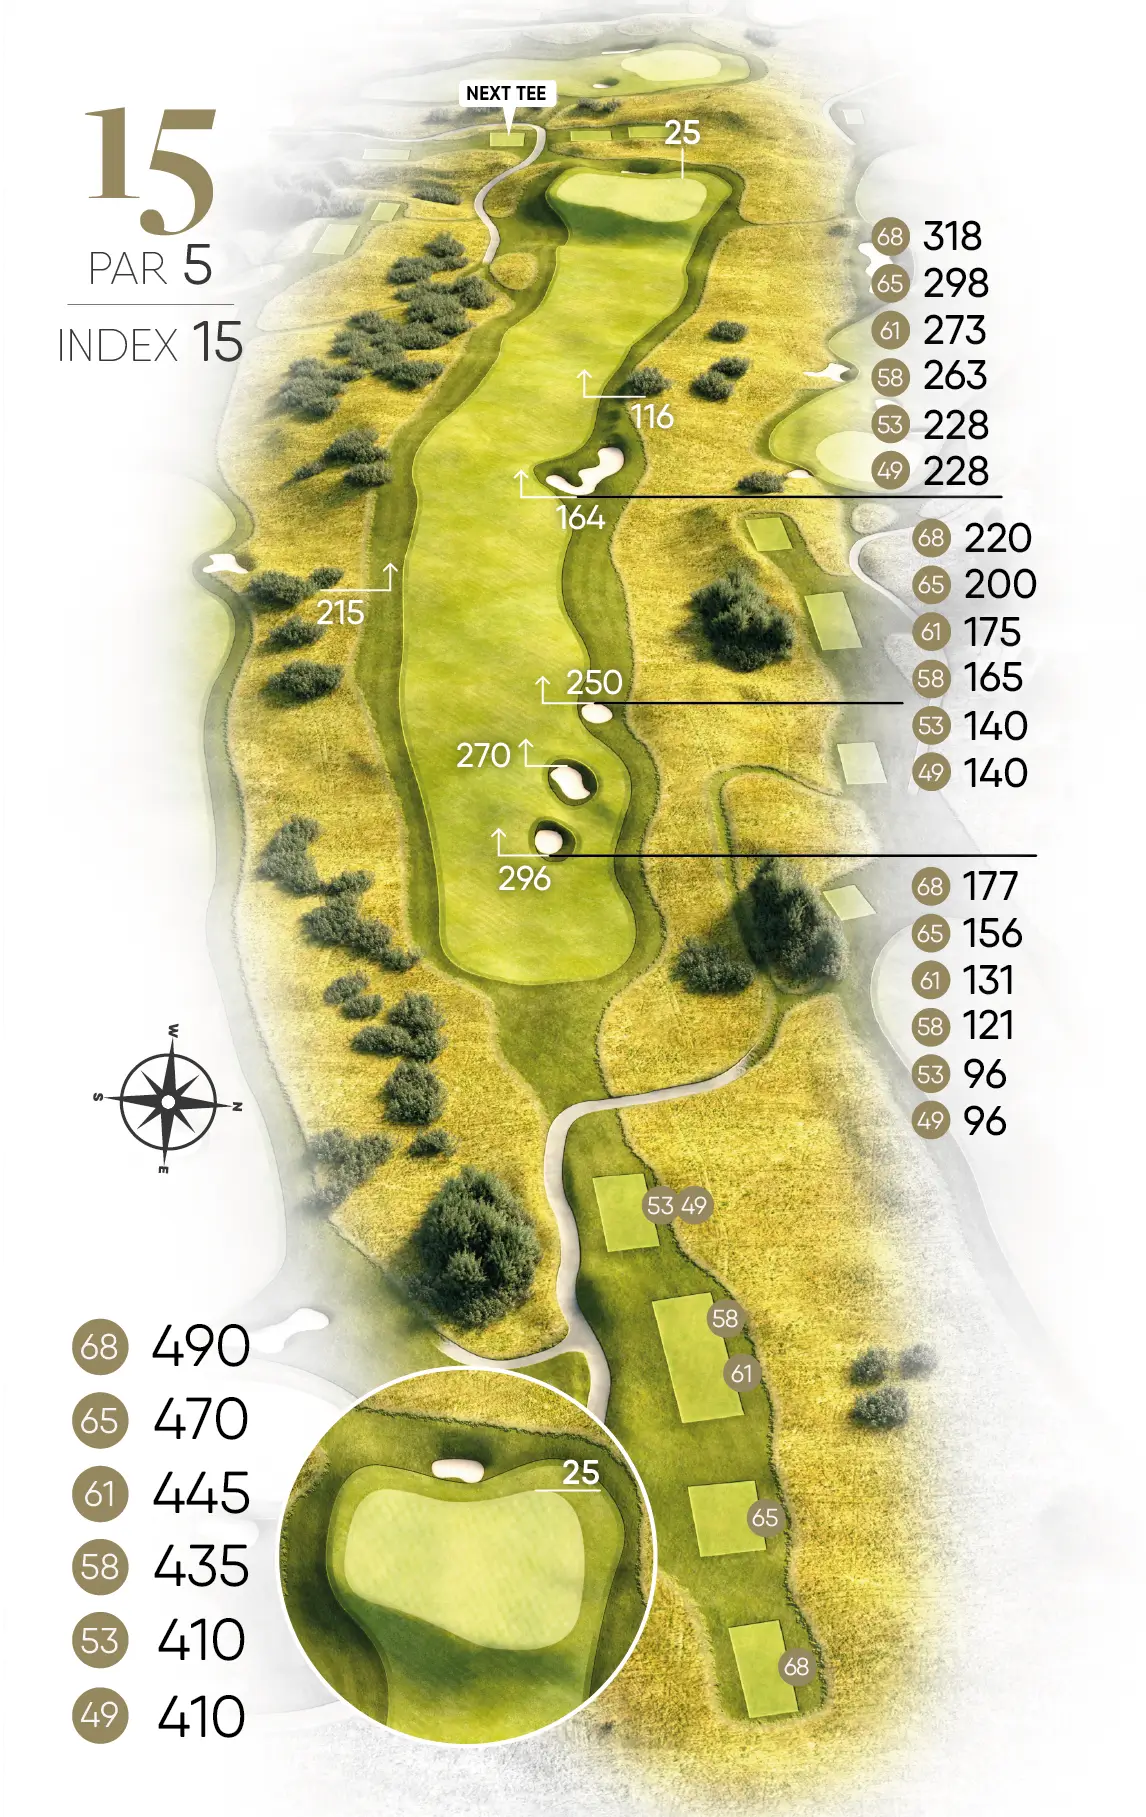
Links Course is a classically timeless 18-hole course created in harmony with nature. From the entire Links Course, you have a view of the brick-clad clubhouse and, in clear weather, you can see all the way to Malmö's Turning Torso. The course's elevation difference of over 20 metres provides a challenging and exciting golf experience.

But can a course located a few miles from the coast really be called Links? The concept itself is strongly associated with the strip of land connecting the sea with cultivated land. Anglicised puritans might grumble a little. But surely we encounter all the hallmarks of a Links here: Hard fairways, preferably lightly sun-browned. Large, hard, undulating greens. Few, if any, trees and quite a lot of deep, small bunkers. Occasional water hazards. And then the gorse bushes, beautifully yellow in the spring.

The Links Course is a modern links, with clear traces of some of the very best and most famous courses on the British Isles. But now we are in Skåne, and the well-known and stunningly beautiful beech forest that surrounds the Links Course clearly confirms its geographical location. The rolling landscape is more than inviting. The swaying rough grass stands exceptionally beautifully against the journey of fluffy little white clouds across the blue sky. The absolute intoxication of the moment.

Annika Sörenstam officially opened the Links Course on a stormy day in June 2009. It was such a stormy day that the first ceremonial drive was taken from a raised tee mat inside the restaurant and out through the open glass doors.

Record of prohibitions

Links Course has hosted several high-level competitions. Many of Sweden's leading golfers have competed on the course and achieved good results. Here are the course records for the Links Course:

Dam record68 votes for Therese NilssonÖrestads Golf Club) under PGA of Sweden National Open – SAS Masters Tour 2009.

Records65 rounds of Alexander BjörkVäxjö Golf Club) in the same competition.

Hole in one

Over the years, many golfers have achieved a hole-in-one on the Links Course – an impressive combination of precision and luck on our modern links course in Skåne. Below you can see which players have achieved this feat, hole by hole.

List of HIOs

Banguide

1

  • Par: 4
  • HCP: 16
  • TEE | Meter
  • 68 - 320
  • 65 - 320
  • 61 - 285
  • 58 - 275
  • 53 - 225
  • 49 - 220
Öppna LinksView

Right from the first tee, you can feel the generosity flowing towards you. You take aim at one of the course's few trees, a safe distance behind the green, and let rip. The long hitter can reach the green, which is naturally guarded by several deep bunkers. A long iron or mid-iron from the tee can be a safe and sensible choice. The gorse bushes to the right will be an unpleasant surprise if you're not straight enough. But as mentioned, it's generous – a wide and good-rolling fairway!

Öppna LinksView

2

  • Par: 5
  • HCP: 6
  • TEE | Meter
  • 68 - 495
  • 65 - 490
  • 61 - 460
  • 58 - 450
  • 53 - 405
  • 49 - 365
Öppna LinksView

A tailwind, a par-four, with a slight draw to the left. You would be well advised to aim a little to the right from the tee. This way, you take the bunkers on the left out of play and make the second shot easier. And even though it's uphill all the way, you might even reach the raised green in two shots. Consider for a moment that it's actually further to the flag than you think. But if you succeed, it's a good foundation for continued success.

Öppna LinksView

3

  • Par: 4
  • HCP: 14
  • TEE | Meter
  • 68 - 375
  • 65 - 375
  • 61 - 350
  • 58 - 320
  • 53 - 255
  • 49 - 255
Öppna LinksView

On this third hole, there's a bit of a headwind so you'll need both energy and hope to continue your winning streak. Aim for the bunkers to the left of the fairway at the start of the climb up to the green, or why not the wind turbines. And once again, take an extra club on your second shot. It never hurts.

Öppna LinksView

4

  • Par: 4
  • HCP: 8
  • TEE | Meter
  • 68 - 410
  • 65 - 390
  • 61 - 365
  • 58 - 355
  • 53 - 305
  • 49 - 305
Öppna LinksView

The elevated tee at Fyrans offers a fine overview. Long hitters have the left-side bunker in play. Aim right; the fairway slopes to the left. Here, you encounter one of architect Kyle Phillips' hallmarks for the first time: the bunkers in front of the green are significantly closer than you think. Phillips leads us into an optical illusion, and it's often for this reason we take too short a club. We are lulled into believing we're dealing with a greenside bunker. This is a recurring phenomenon on several holes.

Öppna LinksView

5

  • Par: 3
  • HCP: 18
  • TEE | Meter
  • 68 - 120
  • 65 - 110
  • 61 - 100
  • 58 - 90
  • 53 - 85
  • 49 - 75
Öppna LinksView

The fifth is only one hundred metres, warning of underestimation. The green is very wide and very shallow. The bunkers in front are clear, the slope towards thick rough behind the green can be an unpleasant surprise. All in all, a fine golf hole that demands humility as well as courage and precision. This is refinement at a high level. Feel, technique and a little luck. One hundred metres, not much, but…

Öppna LinksView

6

  • Par: 4
  • HCP: 2
  • TEE | Meter
  • 68 - 435
  • 65 - 415
  • 61 - 400
  • 58 - 380
  • 53 - 360
  • 49 - 325
Öppna LinksView

The sixth hole is a relatively long par four. From the tee, it's easy to only see the bunkers on the left and, despite not wanting to hit into a blind area on the right, you should do it. So, give in to your need for control. Aim right! The semi-rough and fairway slop to the left, and your drive often ends up perfectly placed even though you can't see the landing area. A lofted second shot often reaches the green and can even go over. It's downhill for the last bit.

Öppna LinksView

7

  • Par: 3
  • HCP: 4
  • TEE | Meter
  • 68 - 200
  • 65 - 190
  • 61 - 170
  • 58 - 150
  • 53 - 130
  • 49 - 105
Öppna LinksView

You tee off from one of the highest points on the course. In the distance, Malmö is visible, and you usually have the wind directly in your face. On the other hand, you are elevated and therefore don't need an extra club to get distance. The flag position can be very decisive for your score. The green has a spectacular valley in the middle that at the same time feels both strange, stimulating, and fun. A short flag position makes the tee shot one of the most challenging on the Links Course.

Öppna LinksView

8

  • Par: 5
  • HCP: 10
  • TEE | Meter
  • 68 - 515
  • 65 - 495
  • 61 - 475
  • 58 - 455
  • 53 - 400
  • 49 - 400
Öppna LinksView

Banana's second pair-five. Real hard hitters can drive and go over the brook. A gamble that is rarely rewarded, a spoon from the tee, or perhaps a five wood. The further right you aim from the tee, the shorter the distance to the brook. The difficulty of hole number eight is largely determined by where the flag is positioned on the green. It is much harder to reach the flag if it is on the plateau to the left, than down to the right.

Öppna LinksView

9

  • Par: 4
  • HCP: 12
  • TEE | Meter
  • 68 - 425
  • 65 - 400
  • 61 - 390
  • 58 - 355
  • 53 - 355
  • 49 - 325
Öppna LinksView

One of the course's three most difficult holes. A long par-four where it's risky to hit driver from the tee. The steep slope at the end of the fairway leads to a stream you can't see. Be careful and hit a spoon instead. This means, on the other hand, that you often have a 160-meter shot ahead of you to one of the most difficult greens to hit. If the flag is on the right of the green, why not try the slightly unorthodox route to the right of the bunker on your second shot.

Öppna LinksView

10

  • Par: 4
  • HCP: 7
  • TEE | Meter
  • 68 - 405
  • 65 - 395
  • 61 - 355
  • 58 - 345
  • 53 - 320
  • 49 - 253
Öppna LinksView

The back nine offers brilliant experiences, starting with the tenth hole. The stream gently meanders and borders the eighteenth hole on the right. For those who hit long, the fairway is considerably wider than it appears from the tee. A long drive on the right-hand side opens up and significantly aids the second shot. The green is deep and slightly elevated. It takes several clubs difference depending on where the flag is placed. It can be difficult to reach.

Öppna LinksView

11

  • Par: 5
  • HCP: 3
  • TEE | Meter
  • 68 - 575
  • 65 - 550
  • 61 - 520
  • 58 - 500
  • 53 - 457
  • 49 - 457
Öppna LinksView

The bunker isn't difficult to reach on the eleventh, but it's not easy to carry either. This means either a long iron or a spoon from the tee. The second shot is a transport shot up the long, steep incline. After that, you'll face the hole's most crucial decision and choice of club to be able to reach the green. Generally, you can't see the landing area, nor can you really tell where the flag is. That is, unless you've been foresighted enough to take a look to the right from the seventh tee earlier in the round.

Öppna LinksView

12

  • Par: 4
  • HCP: 11
  • TEE | Meter
  • 68 - 390
  • 65 - 365
  • 61 - 355
  • 58 - 335
  • 53 - 315
  • 49 - 288
Öppna LinksView

From the twelfth tee, you gaze out over a fantastically beautiful golf hole. Naturally, it’s best to keep your drive on the fairway, but don’t despair if you’ve ended up to the left of the second bunker system. From there, you actually have a good view of the crossing stream just in front of the green, perhaps even better than from the mown playing field. And you have to hit the ball further than you think. Otherwise, it’s the bunker or, in the worst case, the stream that awaits.

Öppna LinksView

13

  • Par: 3
  • HCP: 13
  • TEE | Meter
  • 68 - 200
  • 65 - 170
  • 61 - 160
  • 58 - 135
  • 53 - 135
  • 49 - 95
Öppna LinksView

The thirteenth hole, once again you need one more club than you thought. But you can always save yourself to the right of the green and let the ball roll in towards the flag. Course architect Kyle Phillips often offers a side of the green that you're better off missing on. If you are going to miss here, do it to the right.

Öppna LinksView

14

  • Par: 4
  • HCP: 1
  • TEE | Meter
  • 68 - 450
  • 65 - 435
  • 61 - 425
  • 58 - 380
  • 53 - 380
  • 49 - 297
Öppna LinksView

The fourteenth is difficult, not to say the absolute hardest hole. A long par four with a blind tee shot, quite steeply uphill and with a green that also hides the flag. Admittedly, you usually have the wind at your back, but that is scant comfort. Don't spend too much time on all the difficulties; aim to the right when you hit up towards the green. There's no shame in losing a stroke or two here.

Öppna LinksView

15

  • Par: 5
  • HCP: 15
  • TEE | Meter
  • 68 - 490
  • 65 - 470
  • 61 - 445
  • 58 - 435
  • 53 - 410
  • 49 - 410
Öppna LinksView

A relatively short par five, usually playing into the wind, but that doesn't matter much. Here, despite a wall in front of the green, you can reach the meticulously cut turf in two shots. If not, play up and have seventy metres left, then place your wedge where you want it. Putt once, and walk off happily. Here, you can sense the various rewards of the clubhouse restaurant. But three holes still remain.

Öppna LinksView

16

  • Par: 4
  • HCP: 17
  • TEE | Meter
  • 68 - 385
  • 65 - 370
  • 61 - 345
  • 58 - 310
  • 53 - 310
  • 49 - 255
Öppna LinksView

The final three offer a deceptive sense of security. The sixteenth is short, but the green can play a number of tricks on you. It slopes considerably more to the right than you might ever imagine. You can, in fact, take advantage of that. If you land your approach shot on the left side...

Öppna LinksView

17

  • Par: 3
  • HCP: 5
  • TEE | Meter
  • 68 - 205
  • 65 - 185
  • 61 - 155
  • 58 - 135
  • 53 - 135
  • 49 - 90
Öppna LinksView

Don't be too put off by the bunkers short of the green or those to the left or right. Nor those in front! Eek, eek… The classic advice of aiming for the middle of the green is never wrong and certainly applies to this magnificent short hole. So, on to the finishing hole, a truly sharp finisher.

Öppna LinksView

18

  • Par: 4
  • HCP: 9
  • TEE | Meter
  • 68 - 440
  • 65 - 405
  • 61 - 395
  • 58 - 385
  • 53 - 350
  • 49 - 335
Öppna LinksView

It's always a good start to have something to aim for. The church in Bara, over there in the distance, is an excellent target. Not into the high rough to the left, and not too far right down into the deep bunkers. No, aim straight for the church spire in Bara, with extra roll over the crest down onto the flatter part of the fairway. Once you're up on the final green, a beautiful creation with the magnificent clubhouse almost within arm's reach, it appears: that indomitable longing to go out again. That's how it works on a truly great golf course.

Öppna LinksView

Slope Calculator for Links Course

Please enter your handicap below to calculate your playing handicap. Handicap tables are also displayed in the pro shop at the hotel and at the first tee on each course.

Course architect

Kyle Phillips

One of the world's foremost course architects. In his designs, he starts from the character of the landscape so that the courses blend in and give the impression that they have always been there. Kyle has designed courses in more than 35 countries, such as Kingsbarns in St Andrews.